| Anchor | ||||
|---|---|---|---|---|
|
| Table of Contents | ||
|---|---|---|
|
| HTML |
|---|
<style>
#temp-video-cover {
display: none;
position: fixed;
top: 0;
bottom: 0;
right: 0;
left: 0;
z-index: 11;
background-color: rgba(0, 0, 0, 0.3);
transition: .15s;
opacity: 0;
font-family: "微软雅黑", "PingFangSC", "Helvetica neue", "Hiragino sans gb", "Arial", "Microsoft YaHei UI", "Microsoft YaHei", "SimSun", "sans-serif";
user-select: none;
-ms-user-select: none;
}
#temp-video-container {
position: absolute;
top: 50%;
left: 50%;
transform: translate(-50%, -50%);
z-index: 1;
}
#temp-video-title {
position: absolute;
opacity: 0;
right: 10px;
top: 0px;
transition: .15s;
}
#temp-video-container:hover #temp-video-title {
display: inline;
opacity: 1;
top: 10px;
}
.FUI-dialog-header {
position: relative;
display: flex;
align-items: center;
padding: 0.5rem 0.8rem 0.5rem 1rem;
background-color: rgb(0, 135, 205);
border-color: rgb(0, 135, 205);
}
.FUI-dialog-header-title {
font-size: 1rem;
word-break: keep-all;
text-overflow: ellipsis;
overflow: hidden;
white-space: nowrap;
flex-grow: 1;
color: white;
}
.FUI-dialog-header-close {
width: 1.25rem;
height: 1.25rem;
font-size: 0.8rem;
line-height: 1.25rem;
border-radius: 0.9rem;
color: #0088CE;
text-align: center;
transition: background-color 0.5s;
cursor: pointer;
background-color: #2FB8FF;
}
.FUI-dialog-header-close:hover {
cursor: pointer;
background-color: #6ACCFF;
}
.FUI-dialog-content {
position: relative;
flex-grow: 1;
background-color: rgb(0, 135, 205);
font-size: 0;
}
.FUI-dialog-footer {
position: relative;
height: 3rem;
min-height: 3rem;
display: flex;
flex-direction: row-reverse;
align-items: center;
padding: 0.5rem;
background-color: #F0F0F0;
}
.FUI-button-svg {
display: inline-block;
}
#speed-box {
background-color: #070707;
border-color: #070707;
color: #8B8B8B;
display: flex;
justify-content: flex-end;
height: 2rem;
align-items: center;
font-weight: 200;
}
.speed-box-header {
font-size: 0.9rem;
cursor: default;
}
.speed-box-content {
display: flex;
font-size: 0.7rem;
}
.speed-box-content>div {
width: 2.7rem;
height: 1.2rem;
background-color: #373737;
margin: 0 0.5rem;
text-align: center;
line-height: 1.2rem;
border-radius: 0.6rem;
cursor: pointer;
}
.speed-box-content>div:hover {
background-color: #555555;
color: #FFFFFF;
}
.speed-box-content .speed-box-selected {
background-color: #767676;
color: #FFFFFF;
}
.speed-box-content .speed-box-selected:hover {
background-color: #767676;
}
</style>
<div style="text-align:right;">
<a title="观看本节视频" href="javascript:showVideo();" style="text-decoration:none;">
<img src="https://help.grapecity.com.cn/download/attachments/46173032/VideoPortal.png?api=v2" />
</a>
</div>
<div id="temp-video-cover">
<div id="temp-video-container">
<div class="FUI-dialog-header">
<span class="FUI-dialog-header-title">活字格视频</span>
<div class="FUI-dialog-header-close" id="FUI-dialog-close" title="" onclick="closeVideo()">
<span class="FUI-button-svg"></span><span class="FUI-button-text">✕</span></div>
</div>
<div class="FUI-dialog-content">
<div style="overflow:hidden;">
<video id="temp-video" src="http://video1.grapecity.com.cn/HuoZiGe/Tutorials/v5.0/教学视频/图表-图表命令.mp4"
height="450" controls="controls" onplaying="startplay()">您的浏览器不支持播放此视频。</video>
</div>
</div>
<div id="speed-box">
<div class="speed-box-header">
<div>倍速:</div>
</div>
<div class="speed-box-content">
<div>0.5X</div>
<div class="speed-box-selected">1.0X</div>
<div>1.25X</div>
<div>1.5X</div>
<div>2.0X</div>
</div>
</div>
</div>
</div>
<script>
var videoContainer = document.getElementById("temp-video-container");
var videoCover = document.getElementById("temp-video-cover");
var video = document.getElementById("temp-video");
function showVideo() {
videoCover.style.display = "block";
setTimeout(function () {
videoCover.style.opacity = 1;
video.play();
}, 200);
}
function closeVideo() {
videoCover.style.opacity = 0;
setTimeout(function () {
videoCover.style.display = "none";
video.pause();
}, 150);
return false;
}
function setPlaySpeed(item) {
video.playbackRate = parseFloat(item.textContent);
document.getElementsByClassName("speed-box-selected")[0].classList.remove("speed-box-selected");
item.classList.add("speed-box-selected");
}
var isplayed = 1;
var startplay = function () {
if (isplayed) {
ga('send', 'event', 'Play Video', '活字格');
isplayed = 0;
}
return false;
}
videoCover.onclick = function (e) {
if (e.target.nodeName === "A") {
closeVideo();
}
}
document.querySelectorAll("#speed-box .speed-box-content>div").forEach((item) => {
item.addEventListener('click', () => { setPlaySpeed(item) });
});
</script> |
 1.描述
1.描述
在活字格的图表中,您可以为图表添加命令,当您单击图表时,会执行您设置的命令。
2.图表命令
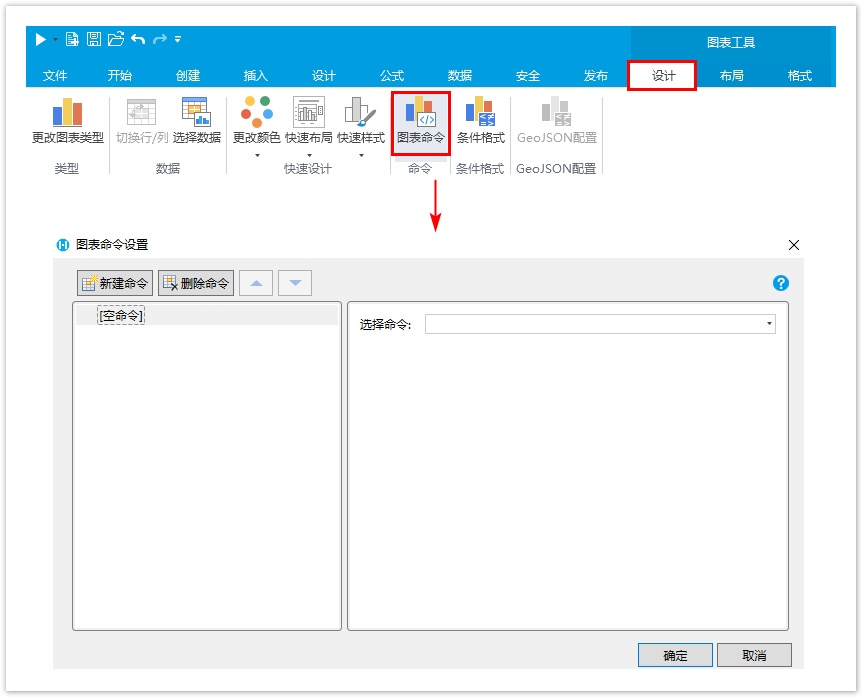
选中图表后,在功能区菜单栏中选择“图表工具-设计->图表命令”,就会弹出图表命令设置对话框。
在图表命令设置对话框中,设置系列名称、类目和值的单元格,单击图表的数据区域时即可获得该区域的系列名称、类目和值,并可设置单击图表数据区域时执行的命令。设置图表命令时,会自动生成默认的参数:系列名称、类目和值,您可以在后面的命令中直接使用这三个参数。
图1 图表命令

例如,为某企业的2018年销售情况制作图表,显示各地区的年度销售额。当单击图表中的数据时,能展示出该地区的销售详情。
操作步骤
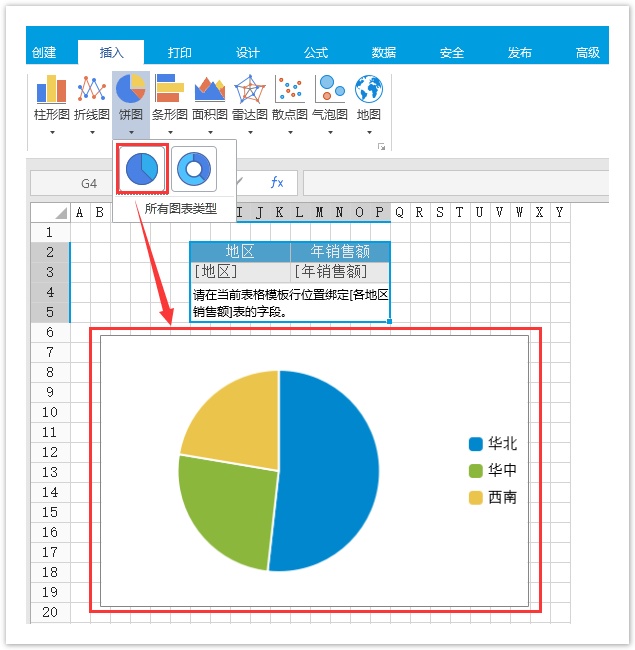
 选中表格,在功能区菜单中选择“插入->饼图”,单击一种饼图,即可插入饼图。
图2 插入饼图

 选中饼图,在功能区菜单栏中选择“图表工具-设计->图表命令”,弹出图表命令设置对话框。
在图表命令设置对话框中,设置系列名称、类目和值的单元格,如下图所示。
图3
图表命令属性设置图表命令


![]() 单击“确定”后,运行页面,单击饼图中的数据区域,就会将该区域的数据显示在设置的系列名称、类目和值的单元格中。
单击“确定”后,运行页面,单击饼图中的数据区域,就会将该区域的数据显示在设置的系列名称、类目和值的单元格中。
图4 显示数据

![]() 在图表命令设置对话框中,单击“编辑命令”,在弹出的对话框中,选择命令为“弹出页面”,选择页面为“详情页面”,并进行高级设置,将单元格G23的值传递到详情页面的D10单元格中。
在图表命令设置对话框中,单击“编辑命令”,在弹出的对话框中,选择命令为“弹出页面”,选择页面为“详情页面”,并进行高级设置,将单元格G23的值传递到详情页面的D10单元格中。
弹出页面命令的具体设置请参见页面命令-弹出页面。
图5 编辑命令

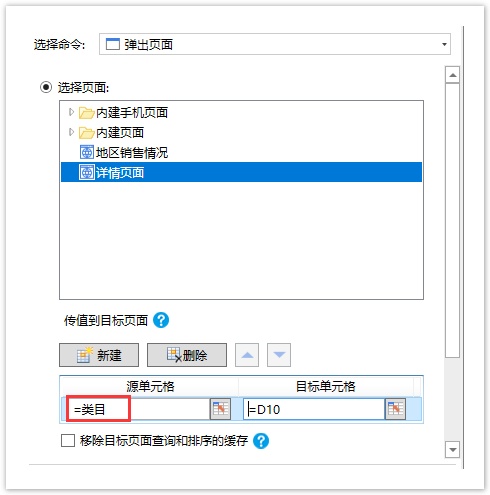
在图表命令设置对话框中,单击“编辑命令”,在弹出的对话框中,选择命令为“弹出页面”,选择页面为“详情页面”,并进行高级设置。
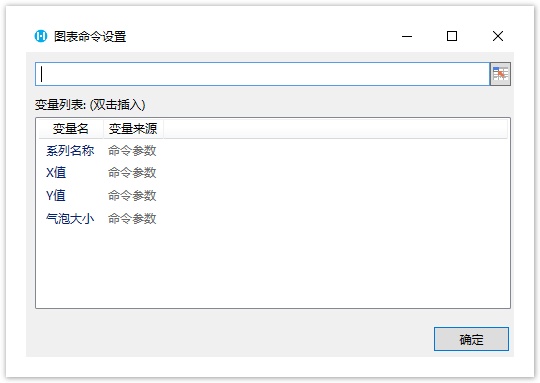
单击源单元格后的![]() ,在弹出的对话框中,选择变量列表中的变量,双击插入。这些变量是系统自动生成的。
,在弹出的对话框中,选择变量列表中的变量,双击插入。这些变量是系统自动生成的。
图4 图表变量
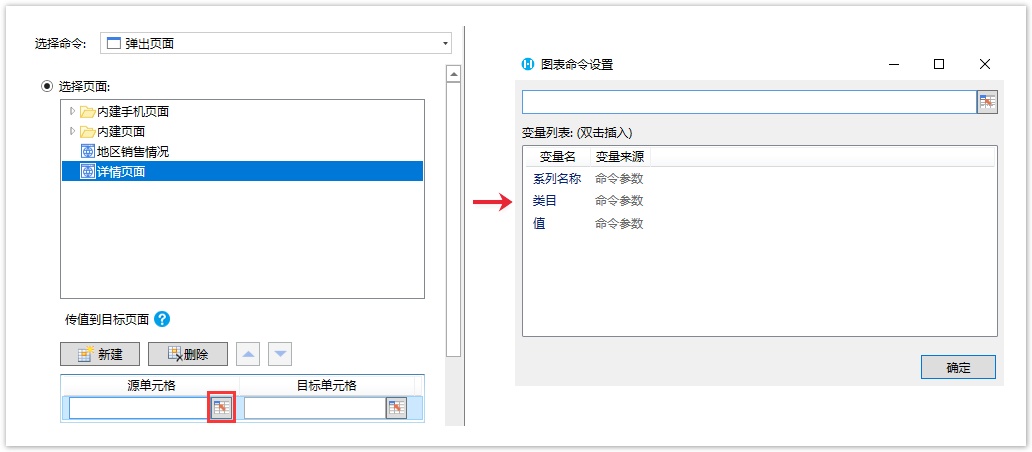
这里我们只需要类目,所以将参数类目传递到弹出页面的目标单元格中。如下图所示。
图5 设置命令
![]() 在详情页面中,设置表格的查询条件,条件为地区等于D10的值,即传来的类目的名称。并将第10行单元格设置隐藏。
在详情页面中,设置表格的查询条件,条件为地区等于D10的值,即传来的类目的名称。并将第10行单元格设置隐藏。
表格的查询条件设置具体请参见表格查询。
图6 设置表格查询

![]()
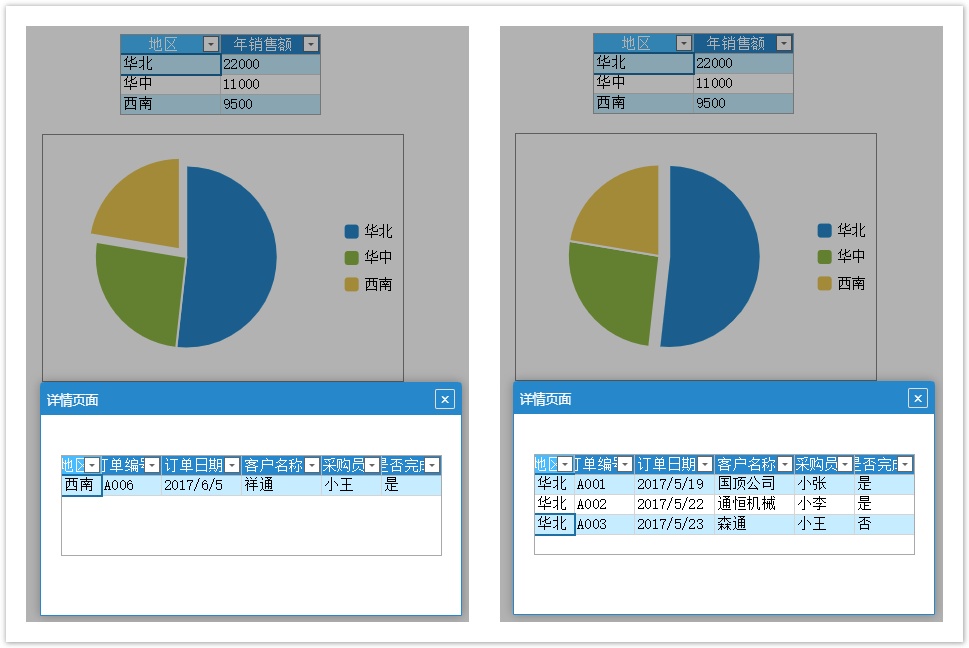
![]() 设置完成后,单击“确定”,运行页面。
设置完成后,单击“确定”,运行页面。
单击饼图中的不同区域时,会弹出该区域对应地区的销售详情。
图7 运行结果

 说明
说明
| Info | ||
|---|---|---|
| ||
|