| Anchor | ||||
|---|---|---|---|---|
|
| Table of Contents | ||
|---|---|---|
|
| HTML |
|---|
<style>
#temp-video-cover {
display: none;
position: fixed;
top: 0;
bottom: 0;
right: 0;
left: 0;
z-index: 11;
background-color: rgba(0, 0, 0, 0.3);
transition: .15s;
opacity: 0;
font-family: "微软雅黑", "PingFangSC", "Helvetica neue", "Hiragino sans gb", "Arial", "Microsoft YaHei UI", "Microsoft YaHei", "SimSun", "sans-serif";
user-select: none;
-ms-user-select: none;
}
#temp-video-container {
position: absolute;
top: 50%;
left: 50%;
transform: translate(-50%, -50%);
z-index: 1;
}
#temp-video-title {
position: absolute;
opacity: 0;
right: 10px;
top: 0px;
transition: .15s;
}
#temp-video-container:hover #temp-video-title {
display: inline;
opacity: 1;
top: 10px;
}
.FUI-dialog-header {
position: relative;
display: flex;
align-items: center;
padding: 0.5rem 0.8rem 0.5rem 1rem;
background-color: rgb(0, 135, 205);
border-color: rgb(0, 135, 205);
}
.FUI-dialog-header-title {
font-size: 1rem;
word-break: keep-all;
text-overflow: ellipsis;
overflow: hidden;
white-space: nowrap;
flex-grow: 1;
color: white;
}
.FUI-dialog-header-close {
width: 1.25rem;
height: 1.25rem;
font-size: 0.8rem;
line-height: 1.25rem;
border-radius: 0.9rem;
color: #0088CE;
text-align: center;
transition: background-color 0.5s;
cursor: pointer;
background-color: #2FB8FF;
}
.FUI-dialog-header-close:hover {
cursor: pointer;
background-color: #6ACCFF;
}
.FUI-dialog-content {
position: relative;
flex-grow: 1;
background-color: rgb(0, 135, 205);
font-size: 0;
}
.FUI-dialog-footer {
position: relative;
height: 3rem;
min-height: 3rem;
display: flex;
flex-direction: row-reverse;
align-items: center;
padding: 0.5rem;
background-color: #F0F0F0;
}
.FUI-button-svg {
display: inline-block;
}
#speed-box {
background-color: #070707;
border-color: #070707;
color: #8B8B8B;
display: flex;
justify-content: flex-end;
height: 2rem;
align-items: center;
font-weight: 200;
}
.speed-box-header {
font-size: 0.9rem;
cursor: default;
}
.speed-box-content {
display: flex;
font-size: 0.7rem;
}
.speed-box-content>div {
width: 2.7rem;
height: 1.2rem;
background-color: #373737;
margin: 0 0.5rem;
text-align: center;
line-height: 1.2rem;
border-radius: 0.6rem;
cursor: pointer;
}
.speed-box-content>div:hover {
background-color: #555555;
color: #FFFFFF;
}
.speed-box-content .speed-box-selected {
background-color: #767676;
color: #FFFFFF;
}
.speed-box-content .speed-box-selected:hover {
background-color: #767676;
}
</style>
<div style="text-align:right;">
<a title="观看本节视频" href="javascript:showVideo();" style="text-decoration:none;">
<img src="https://help.grapecity.com.cn/download/attachments/46173032/VideoPortal.png?api=v2" />
</a>
</div>
<div id="temp-video-cover">
<div id="temp-video-container">
<div class="FUI-dialog-header">
<span class="FUI-dialog-header-title">活字格视频</span>
<div class="FUI-dialog-header-close" id="FUI-dialog-close" title="" onclick="closeVideo()">
<span class="FUI-button-svg"></span><span class="FUI-button-text">✕</span></div>
</div>
<div class="FUI-dialog-content">
<div style="overflow:hidden;">
<video id="temp-video" src="http://video1.grapecity.com.cn/HuoZiGe/Tutorials/v5.0/教学视频/服务端配置-更改单点登录密码.mp4"
height="450" controls="controls" onplaying="startplay()">您的浏览器不支持播放此视频。</video>
</div>
</div>
<div id="speed-box">
<div class="speed-box-header">
<div>倍速:</div>
</div>
<div class="speed-box-content">
<div>0.5X</div>
<div class="speed-box-selected">1.0X</div>
<div>1.25X</div>
<div>1.5X</div>
<div>2.0X</div>
</div>
</div>
</div>
</div>
<script>
var videoContainer = document.getElementById("temp-video-container");
var videoCover = document.getElementById("temp-video-cover");
var video = document.getElementById("temp-video");
function showVideo() {
videoCover.style.display = "block";
setTimeout(function () {
videoCover.style.opacity = 1;
video.play();
}, 200);
}
function closeVideo() {
videoCover.style.opacity = 0;
setTimeout(function () {
videoCover.style.display = "none";
video.pause();
}, 150);
return false;
}
function setPlaySpeed(item) {
video.playbackRate = parseFloat(item.textContent);
document.getElementsByClassName("speed-box-selected")[0].classList.remove("speed-box-selected");
item.classList.add("speed-box-selected");
}
var isplayed = 1;
var startplay = function () {
if (isplayed) {
ga('send', 'event', 'Play Video', '活字格');
isplayed = 0;
}
return false;
}
videoCover.onclick = function (e) {
if (e.target.nodeName === "A") {
closeVideo();
}
}
document.querySelectorAll("#speed-box .speed-box-content>div").forEach((item) => {
item.addEventListener('click', () => { setPlaySpeed(item) });
});
</script>
|
 1.描述
1.描述
活字格支持负载均衡,开启负载均衡后,可提高活字格处理高并发的能力。
如果要使用负载均衡功能,您必须提前注册用户许可为固定用户或无限并发用户。
2.负载均衡配置
操作步骤
 登录到管理控制台,选择“帮助支持->负载均衡配置”,进入负载均衡配置页面。
勾选“开启”前面的复选框后,进行负载均衡配置。
图1 负载均衡
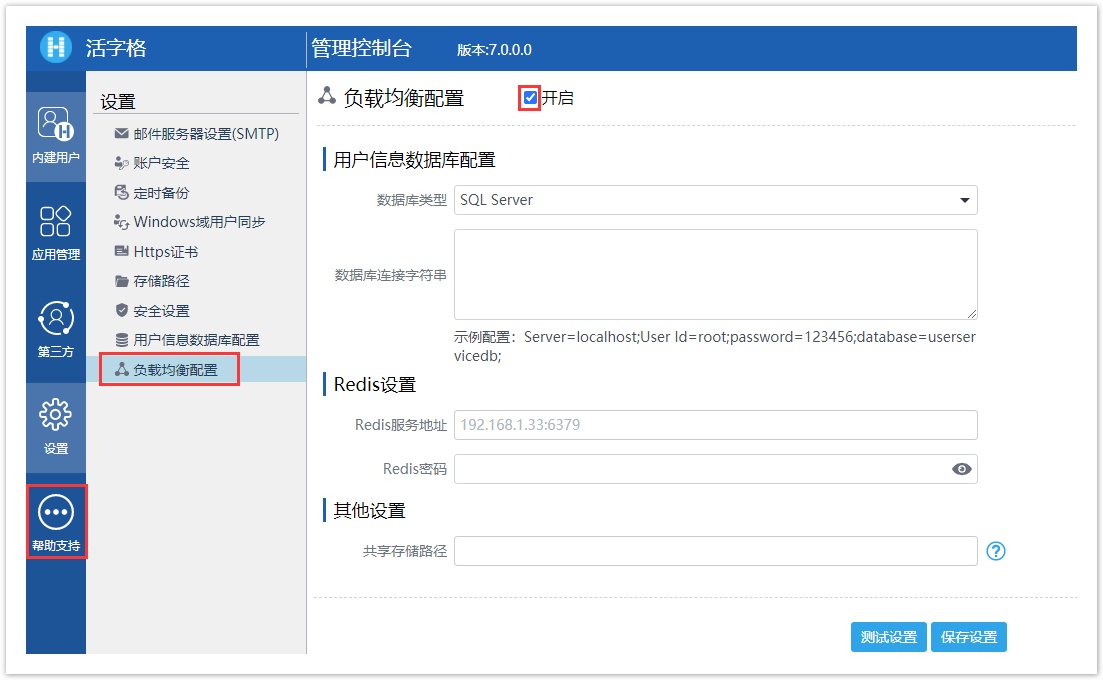
用户信息数据库配置
设置用户信息数据库类型为MySQL或SQL Server,并配置数据库连接字符串。具体请参见用户信息数据库配置。
Redis设置
设置Redis服务地址和密码,如果没有密码可以不填写。
其他设置
设置共享存储路径,用来存储应用元数据、应用配置等信息。
 发布应用。将您的应用发布到任意一个服务器上,如果发布到Linux服务器上,请确保端口号没有被占用。
发布的应用中不能有内建的数据表,也不能使用Windows域认证。
 在安装了Nginx的Linux服务器上配置Nginx。
Debian-Based(操作系统为Ubuntu)
在下面的示例中,有五个活字格服务器(10.32.7.193、10.32.7.186、10.32.7.194、10.32.7.187、10.32.7.106),其中应用程序myapp部署在端口9527上。
1.使用以下命令,创建一个新文件:
sudo vi /etc/nginx/sites-available/myapp.conf
2.将下面的内容粘贴到创建的“myapp.conf”中:
如果要为多个应用配置负载均衡,需注意每个应用的.conf文件里的upstream名称应该唯一。
| Code Block |
|---|
upstream loadblance {
  server 10.32.7.193:9527 weight=1 max_fails=1 fail_timeout=30s;
  server 10.32.7.186:9527 weight=1 max_fails=1 fail_timeout=30s;
  server 10.32.7.194:9527 weight=1 max_fails=1 fail_timeout=30s;
  server 10.32.7.187:9527 weight=1 max_fails=1 fail_timeout=30s;
  server 10.32.7.106:9527 weight=1 max_fails=1 fail_timeout=30s;
}


server {
  listen 80;
  listen [::]:80;
  server_name myapp;
  gzip  on;
  client_max_body_size 2048m;
  location / {
        proxy_set_header   Upgrade $http_upgrade;
        proxy_set_header   Connection keep-alive;
        proxy_set_header   Host $host;
        proxy_cache_bypass $http_upgrade;
        proxy_set_header   X-Forwarded-For $proxy_add_x_forwarded_for;
        proxy_set_header   X-Forwarded-Proto $scheme;
        add_header X-Upstream $upstream_addr;
        proxy_pass http://loadblance;
        proxy_http_version 1.1;
  }
} |
3.创建一个指向目录的链接“sites-enabled”来启用文件,在启动时由Nginx读取该目录:
sudo ln -s /etc/nginx/sites-available/myapp.conf /etc/nginx/sites-enabled/
4.测试文件中是否有语法错误:
sudo nginx -t
5.重启Nginx:
sudo systemctl restart nginx
6.重启Nginx后,可以通过Nginx访问您的应用:http://nginx_server_ip/appname
RPM-Based(操作系统为CentOS、RedHat 7.6、中标麒麟)
在下面的示例中,有五个活字格服务器(10.32.7.193、10.32.7.186、10.32.7.194、10.32.7.187、10.32.7.106),其中应用程序myapp部署在端口9527上。
1.使用以下命令,创建一个新文件:
sudo vi /etc/nginx/conf.d/myapp.conf
2.将下面的内容粘贴到创建的“myapp.conf”中:
| Code Block |
|---|
upstream loadblance {
  server 10.32.7.193:9527 weight=1 max_fails=1 fail_timeout=30s;
  server 10.32.7.186:9527 weight=1 max_fails=1 fail_timeout=30s;
  server 10.32.7.194:9527 weight=1 max_fails=1 fail_timeout=30s;
  server 10.32.7.187:9527 weight=1 max_fails=1 fail_timeout=30s;
  server 10.32.7.106:9527 weight=1 max_fails=1 fail_timeout=30s;
}


server {
  listen 80;
  listen [::]:80;
  server_name myapp;
  gzip  on;
  client_max_body_size 2048m;
  location / {
        proxy_set_header   Upgrade $http_upgrade;
        proxy_set_header   Connection keep-alive;
        proxy_set_header   Host $host;
        proxy_cache_bypass $http_upgrade;
        proxy_set_header   X-Forwarded-For $proxy_add_x_forwarded_for;
        proxy_set_header   X-Forwarded-Proto $scheme;
        add_header X-Upstream $upstream_addr;
        proxy_pass http://loadblance;
        proxy_http_version 1.1;
  }
} |
3.测试文件中是否有语法错误:
sudo nginx -t
4.重启Nginx:
sudo systemctl restart nginx
5.重启Nginx后,可以通过Nginx访问您的应用:http://Nginx服务器IP/应用名
![]() (可选)如果您要将您的应用发布为Https网站,则需要执行此步骤。(可选)如果您要将您的应用发布为Https网站,则需要在安装了Nginx的服务器上,执行以下步骤。
(可选)如果您要将您的应用发布为Https网站,则需要执行此步骤。(可选)如果您要将您的应用发布为Https网站,则需要在安装了Nginx的服务器上,执行以下步骤。
1.创建SSL证书。
TLS / SSL通过结合使用公共证书和私钥来工作。SSL密钥在服务器上被保密。它用于加密发送给客户端的内容。SSL证书与请求内容的任何人公开共享。它可用于解密由关联的SSL密钥签名的内容。
您可以从云供应商处购买Https证书,并使用公共利益组织提供的Https证书。在测试环境中,我们使用自签名证书。
我们可以在单个命令中使用OpenSSL创建自签名密钥和证书对:
sudo openssl req -x509 -nodes -days 365 -newkey rsa:2048 -keyout /etc/ssl/private/nginx-selfsigned.key -out /etc/ssl/certs/nginx-selfsigned.crt
openssl:这是用于创建和管理OpenSSL证书,密钥和其他文件的基本命令行工具。
req:此子命令指定我们要使用X.509证书签名请求(CSR)管理。“ X.509”是SSL和TLS对其密钥和证书管理所遵循的公共密钥基础结构标准。我们要创建一个新的X.509证书,因此我们正在使用此子命令。
-x509:通过告诉实用程序我们要制作自签名证书,而不是像通常那样生成证书签名请求,从而进一步修改了先前的子命令。
-nodes:跳过使用密码短语来保护我们的证书的选项。我们需要Nginx在服务器启动时能够在无需用户干预的情况下读取文件。密码短语可以防止这种情况的发生,因为每次重新启动后我们都必须输入密码。
-days 365:证书有效的时间。这里设置了一年。
-newkey rsa:2048:指定同时生成一个新证书和一个新密钥,生成一个2048位长的RSA密钥。
rsa:2048-keyout:生成的私钥文件存放的路径。
-out:创建的证书存放的路径。
执行这个命令后,就会开始创建一个证书和一个密钥。在此之间,您需要按照提示输入所需信息,如下:
| Code Block |
|---|
OutputCountry Name (2 letter code) [AU]:US State or Province Name (full name) [Some-State]:New York Locality Name (eg, city) []:New York City Organization Name (eg, company) [Internet Widgits Pty Ltd]:Bouncy Castles, Inc. Organizational Unit Name (eg, section) []:Ministry of Water Slides Common Name (e.g. server FQDN or YOUR name) []:server_IP_address Email Address []:admin@your_domain.com |
其中,Common Name是最重要的信息,您需要输入与服务器关联的域名,或者输入服务器的公共IP地址。
命令执行完成后,创建的两个文件都将放置在相应的目录中。
在使用OpenSSL时,我们还应该创建一个Diffie-Hellman组,该组用于与客户端协商“。
执行以下命令:
sudo openssl dhparam -out /etc/nginx/dhparam.pem 4096
命令执行完成后,会在“/etc/nginx/dhparam.pem”中生成一个DH组,我们可以在配置中使用。
2.配置Nginx以使用SSL。
①执行以下命令,创建一个新文件“self-signed.conf”。
sudo vim /etc/nginx/snippets/self-signed.conf
②在“self-signed.conf”文件中,添加以下内容:
ssl_certificate /etc/ssl/certs/nginx-selfsigned.crt;
ssl_certificate_key /etc/ssl/private/nginx-selfsigned.key;
③执行以下命令,创建一个新文件“ssl-params.conf”。
sudo vi /etc/nginx/snippets/ssl-params.conf
④将以下内容拷贝到“ssl-params.conf”文件中。
| Code Block |
|---|
ssl_protocols TLSv1.2; ssl_prefer_server_ciphers on; ssl_dhparam /etc/nginx/dhparam.pem; ssl_ciphers ECDHE-RSA-AES256-GCM-SHA512:DHE-RSA-AES256-GCM-SHA512:ECDHE-RSA-AES256-GCM-SHA384:DHE-RSA-AES256-GCM-SHA384:ECDHE-RSA-AES256-SHA384; ssl_ecdh_curve secp384r1; # Requires nginx >= 1.1.0 ssl_session_timeout 10m; ssl_session_cache shared:SSL:10m; ssl_session_tickets off; # Requires nginx >= 1.5.9 ssl_stapling on; # Requires nginx >= 1.3.7 ssl_stapling_verify on; # Requires nginx => 1.3.7 resolver 8.8.8.8 8.8.4.4 valid=300s; resolver_timeout 5s; # Disable strict transport security for now. You can uncomment the following # line if you understand the implications. # add_header Strict-Transport-Security "max-age=63072000; includeSubDomains; preload"; add_header X-Frame-Options DENY; add_header X-Content-Type-Options nosniff; add_header X-XSS-Protection "1; mode=block"; |
⑤执行以下命令,备份文件:
Debian-Based:
sudo cp /etc/nginx/sites-available/myapp.conf /etc/nginx/sites-available/myapp.conf.bak
RPM-Based:
sudo cp /etc/nginx/conf.d/myapp.conf /etc/nginx/conf.d/myapp.conf.bak
⑥执行以下命令,打开配置文件:
Debian-Based:
sudo vi /etc/nginx/sites-available/myapp.conf
RPM-Based:
sudo vi /etc/nginx/conf.d/myapp.conf
⑦在配置文件中,更新两个listen语句以使用443端口和ssl,并且包含之前步骤创建的两个文件:“self-signed.conf”和“ssl-params.conf”。
| Code Block |
|---|
upstream loadblance {
    server 10.32.7.193:9527 weight=1 max_fails=0 fail_timeout=600;
    server 10.32.7.186:9527 weight=1 max_fails=0 fail_timeout=600;
    server 10.32.7.194:9527 weight=1 max_fails=0 fail_timeout=600;
    server 10.32.7.187:9527 weight=1 max_fails=0 fail_timeout=600;
    server 10.32.7.106:9527 weight=1 max_fails=0 fail_timeout=600;
}

server {
    listen 443 ssl;
    listen [::]:443 ssl;
    include snippets/self-signed.conf;
    include snippets/ssl-params.conf;
    gzip  on;
     client_max_body_size 2048m;
    server_name forguncyapp.com www.forguncyapp.com;
    location / {
         proxy_set_header   Upgrade $http_upgrade;
         proxy_set_header   Connection keep-alive;
         proxy_set_header   Host $host;
         proxy_cache_bypass $http_upgrade;
         proxy_set_header   X-Forwarded-For $proxy_add_x_forwarded_for;
         proxy_set_header   X-Forwarded-Proto $scheme;
         proxy_set_header Host $host;
          add_header X-Upstream $upstream_addr;
       proxy_pass http://loadblance;
       proxy_http_version 1.1;
   }
} |
3.调整防火墙。
①执行以下命令,查看可用的配置文件:
sudo ufw app list
输出如下:
OutputAvailable applications:
Nginx Full
Nginx HTTP
Nginx HTTPS
OpenSSH
②执行以下命令,查看当前设置:
sudo ufw status
输出如下,说明只有HTTP流量允许通过Web服务器。
OutputStatus: active
To Action From
-- ------ ----
OpenSSH ALLOW Anywhere
Nginx HTTP ALLOW Anywhere
OpenSSH (v6) ALLOW Anywhere (v6)
Nginx HTTP (v6) ALLOW Anywhere (v6)
③执行以下命令,允许HTTPS流量通过Web服务器:
sudo ufw allow 'Nginx Full'
sudo ufw delete allow 'Nginx HTTP'
④执行以下命令,查看当前设置:
sudo ufw status
输出如下:
OutputStatus: active
To Action From
-- ------ ----
OpenSSH ALLOW Anywhere
Nginx Full ALLOW Anywhere
OpenSSH (v6) ALLOW Anywhere (v6)
Nginx Full (v6) ALLOW Anywhere (v6)
4.启用Nginx的更新。
①执行以下命令,检查所有的文件中是否有语法错误:
sudo nginx -t
输出如下,表示正常,没有语法错误:
Outputnginx: [warn] "ssl_stapling" ignored, issuer certificate not found
nginx: the configuration file /etc/nginx/nginx.conf syntax is ok
nginx: configuration file /etc/nginx/nginx.conf test is successful
②执行以下命令,重启Nginx:
sudo systemctl restart nginx
5.测试加密。
打开Web浏览器,然后在地址栏中输入服务器的域名或IP。
https://server_domain_or_IP
由于我们创建的证书不是由浏览器的受信任证书颁发机构之一签名的,因此您可能会看到类似以下内容的警告:
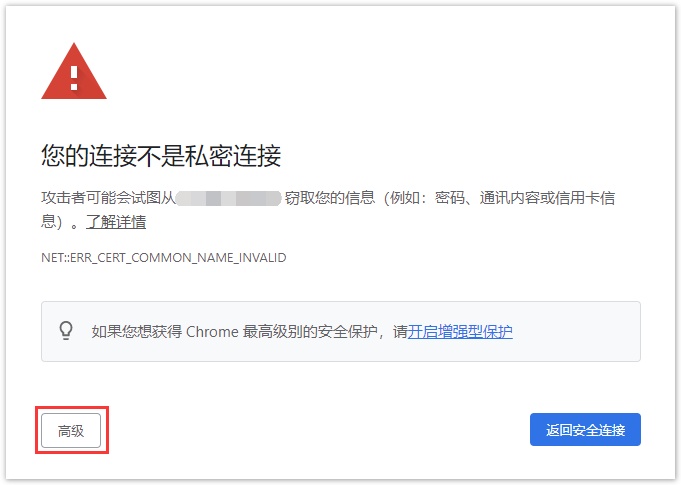
这是正常现象。单击“高级”,然后单击链接进入网站:
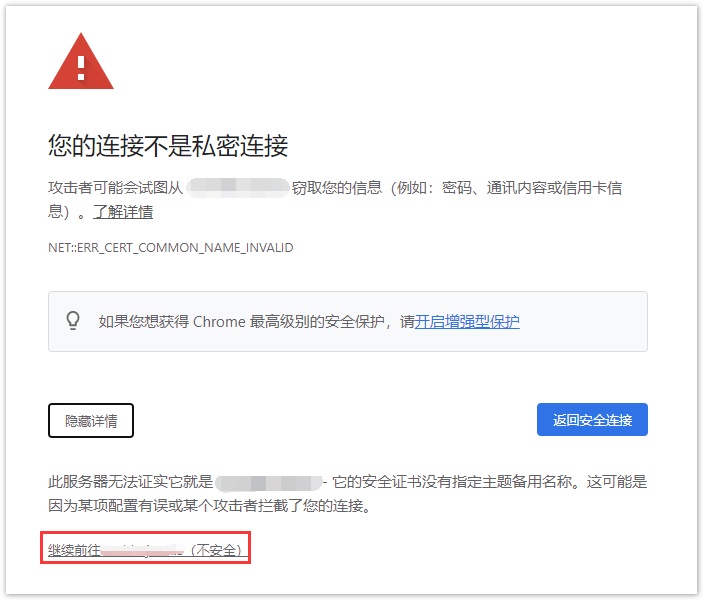
这时,您会进入到您的网站。如果您在浏览器地址栏中查看,会看到一个带有“x”的锁。这仅说明无法验证证书,但它仍在加密您的连接。
![]()
